Quantcast
Channel: Cards and Crafts
Viewing all 609 articles
Browse latest View live

Paper Flowers Encore !

$
0
0
Paper Flowers
             Dear friends if you have already seen this window card do forgive me as I had to repost this for having stupidly deleted the earlier published post! Dont ask me how I did it ...maybe the blogging gods [or maybe for us crafty blogs its goddesses] wanted to see me pull my hair ,stamp my feet, curse myself and generally act like a loony lady !!
And I think only a crafty blogger can understand the true enormity of it...lost challenge links ,lost comments..booo hooo!!
Paper flowers
           Well on a more positive side if you are seeing the card for the first time or even 2nd time do tell me the flowers [or whatever else you like] are gorgeous !! [here is the tutorial link : Paper Flower tutorial ]
Sola wood leaves
The leaves are cut from sola wood [ made of tapioca].See link to sola wood flowers and yeah I heat embossed for the first time!!
Heat embossing
Have thrown in all kinds of materials in this card....corrugated paper[ the silver leaves],glitter foam[ the swirls and swirly border],pearls, lace and sola wood!
Window card
            Deleting a popular post in which so many blogger friends wrote such sweet comments is one of the most foolish things I have done in my 4 years of blogging !!
IF you can spare a moment do sympathise!!! And hope the blogging gods take pity on me!!

3 D Wall Decor

$
0
0
Quilling 2
Quilling
     Dear friends sharing a 3 D wall decor I made for our home using 3 Dimensional stickers  ,die cuts and quilled leaves
Quilling 4
3D Wall art
          I had actually made this as a birthday present for my husband  who loves birds, gardens, music and quilling! Recycled a cardboard box to form the base of my wall art and stuck corrugated paper on it.  If you are a regular reader of my blog you , you must have seen I am a big fan of corrugated paper!- I just love the texture and look of corrugated paper.
Quilling 1
3 D Spring scene
The fence was cut from glitter foam using a die. The shimmery flowers are 3 D wall decor stickers which I further embellished with pearls. Added quilled leaves on the branches
Quilling 5
Home decor
My daughter helped place the clouds and the butterflies on our simple 3 Dimensional wall decor.
Quilling 3
Quilling
         This was a super easy project to make[ especially since I had a ready stash of quilled leaves made earlier!] .The flowers are actually made of multiple thin plastic sheets mounted on sponge and its awesome to see the light reflecting on the stickers and my glittery embellishments.
Though a simple project I hope you like it....
Linking to Imaginations July,Crafts and me 149 [ add wings],Creative Corner[ flowers],Sisters of craft July,Lia Stamps 68 [ no PP],Ladybug crafts[summer flowers],Just for fun challenges 1,Laural craft 6 [ things with wings]

3 D Pop Up Card Tutorial

$
0
0
pop up cards 1
3 D Pop Up card
       Dear friends designed this 3 D Window Pop up Card combining techniques from the Tunnel card tutorial and Interactive Window card tutorial featuring simple accordion folded steps as the pop  up mechanism.The 3 D window [but not the arch] can fold flat onto the snowy Christmas scene featuring Santa and his reindeers in this pop up card.
pop up cards 2
Pop Up Christmas card
        I added a rhinestone embellished foam Christmas tree and silver snowflakes on the steps in front of the windows.The snow was hand cut from felt and the roses are foam roses[Here are the tutorial links : Foam rose tutorial 1, Foam rose tutorial 2]
3 D Pop Up Card 4
Foam Roses

3 D Window Pop up card tutorial 

Materials Required
2 A4 size thick Paper - One to make the windows and one to make the background and steps.Contrasting colors are better to enhance the 3 D effect
Glue and Scissors
To cut windows- cut your windows using a craft knife and a cutting mat/ kitchen cutting board or use dies if you have a die cutting machine
Optional : Scoring board
Pop Up Card tutorial 1
Pop up card tutorial 
Make the windows : I used an A 4 pattern paper with a silver brocade pattern. You can use cardstock/ ivory sheets /thick good quality pattern paper.You will need only half of an A 4 card plus 3/4 inches. Fold the A 4 card in half and keeping approx 3/4 inches from the fold line as a glue tab discard the rest as shown in the pictorial.
Pop Up Card tutorial 2
Pop up card tutorial 
Cut the windows : Use a craft knife and cutting board[ you can use a clean kitchen board if you don't have a craft mat] or your dies to cut out windows leaving at least a 3/4 inch border all around [anything less and your window front will not be stable and will buckle hopelessly !!]
Pop Up Card tutorial 3
Pop up card tutorial 
To make the background and steps: Fold the base A 4 card in half .Score half of this A4 card every 3/4 inches and accordion fold as shown in the pictorial. It doesnt really matter if you dont have a scoring board as I am sure we have all made paper fans in childhood and its pretty much the same kind of accordion folds and you don't have to be super accurate even!
Pop Up Card tutorial 4
Pop up card tutorial 
Glue the tab of your window panel onto the unfolded half of the "background  card" as shown.You can either glue in front or behind like I have done.
Pop Up Card tutorial 5
Pop up card tutorial 
Add scenic elements on your background card. I hand cut my snowy landscape from felt and my santa and reindeer are die cut from glitter foam.
Pop Up Card tutorial 7
Pop up card tutorial 
Glue your window panel on the 2nd mountain formed by the accordion folds as shown in the pictorial. If you wish you can even add some more pop up design elements on the accordion folds behind your window
Pop Up Card tutorial 8
Pop up card tutorial 
It can get a bit tricky to defy gravity on the steps in front of your pop up window.The picture shows how I made my Christmas tree stand upright by supporting it with additional foam glued to both slopes of the step.
3 D Pop Up Card 3
Pop up card tutorial 
This pop up card design can fold absolutely flat to fit into an envelope.This particular Pop up christmas card however needs a box envelope courtesy the foam roses and the 3 D arches I added atop my windows
Pop Up Card tutorial 9
Pop up card tutorial 
I love making Pop up and  interactive cards as I have a very appreciative little girl at home and happy to tell you that this particular pop up card design received a thumbs up after thorough inspection by my 8 year old  [ though she did say she preferred Santa Claus to have eyes !]
pop up cards 3
Pop up card tutorial 
I hope you like this pop up mechanism.Do check out my Craft tutorials page for more tutorials including 24 Pop up card tutorials 

Supplies :Dies: Cheery Lynn Flourish Leaf strip  ,Cheery Lynn Windows A , Sizzix Santa sleigh with reindeer,Spellbinder Curved Borders 2 , Spellbinder Holiday tree ,Memory Box Frostyville borer 
Linking to : Cheery Lynn Christmas in July, BGC , Create something catchy , Crafty Hazelnuts christmas challenge July,DiesR US 5 Christmas in July,Imagination craft challenges Anything goes July ,Just for fun 1,One sweet challenge  July[red white blue],Sparkles Christmas challenge 42[ christmas scene],Digichoosday 26 [aperture],Holly Jolly Christmas challenge[ show me some glitter],Party time tuesday 179[red white blue],Craftin desert divas[ red white blue],Pink elephant 257[anything],Sweet stamps 176 [dreaming of snow],Through the craft room door [july 1-7],Tuesday throw down  202,Christmas card challenges 31,My Perfect life[Christmas card],Squirrel and fox 73 christmas in July,Cup cake inspiration 267 ,My time to craft 252[ christmas],Completely Christmas 18,Pumpkin spice[ red white blue],Christmas all round

Swinging Card Tutorial

$
0
0

Swinging Card 8
Swinging Card
      Dear friends this interactive swinging card is my Guest DT post for  Digital Delights  for winning the Petal Power challenge with my Mother’s Day Card.
         Delightful challenges holds a very special place in my heart as I won my first Guest DT post ever [back in 2011] with  this Quilled Sunflower Girl…I was so nervous when I used their digital image [ first time I worked with digis ]  in a Side step pop up card which was my first guest DT post and that card in turn won me a Guest DT at  Crafty JC
        I have done numerous Guest DT posts since then for various websites and craft shops but believe me I still get super nervous as to how a Guest Post will be received!I hope you guys enjoy this Easy to make Swinging card and tutorial
Swinging Card 9
Swinging Card
         I used the super cute digital image "Relax Barnaby" from Digital Delights, 3D decoupaged him and suspended his hammock from palm trees in this tropical paradise themed swinging interactive card.
Swinging Card 10
Swinging Card
       My daughter is forever searching for her eraser and pencil sharpener during homework time and I had been intending to make a  tray to hold her stationary...so I placed my interactive tent card on a cardboard box lid dressed up with glitter foam grass and handmade flowers.
Swinging Card 5
Handmade flowers
What is paradise without some flowers so added some quilled flowers and stamped leaves to my tent card.
Swinging Card 6
Handmade flowers
I always make my own flowers and the large red flower is also handmade and here is the tutorial link : Easy Flower tutorial 

Sharing How to make a Swinging Card

Material required
Cardstock - any size will do but I used an A 4 and a 6 x 8 inch piece of card stock
Glue- I used Fevicol MR 
Scissors
Something to cut an aperture
To punch holes- single hole punch  or crop a dile
Twine, thread or ribbon to suspend your image
Optional - Scoring board, Eyelets and eyelet setter / crop a dile

Swinging Card tutorial  1
Swinging Card Tutorial
         On the folded edge of an A 4 card mark a semicircle  using a template [ use anything you have like a plate, lid, circle die,or even a  foam tape like I used here]-- just make sure you leave 1 1/2 - 2 inches on either side so that your card remains sturdy! 
         Cut out a semi circle ,oval, square or rectangle aperture [ the aperture can be any shape you fancy!] on the folded edge cutting through both halves of your A 4 card
Swinging Card tutorial  2
Swinging Card Tutorial
            As an interactive card is going to be played with quite a bit  you need a good sturdy base so that it doesn't topple over! I chose a 6 x 8 inch card [ you can play with measurements] and  folded it in half [ center mountain fold] and then folded up [valley fold]1 inch on either side to get an accordion fold in the shape of a  "W".
If you have a scoring board :score on the 6 inch side at  1 , 3 and  5 inch marks.
Swinging Card tutorial  3
Swinging Card Tutorial
        The 1 inch folded parts of your accordion folded " W "are your gluing tabs.Apply glue to one gluing tab of the " w " as shown and stick it inside the tent card you had already made.Apply enough glue and pressure as its important to get a good adhesion here.
Swinging Card tutorial  4
Swinging Card Tutorial
          Fold your " W " accordion and apply glue on the other gluing tab and firmly stick the other flap of your tent card onto it. The tent card on which your swinging element is going to be hung is ready!
Swinging Card 2
Swinging Card Tutorial
           On either side of  your aperture ,add decorative elements such as trees, vines ,lattices or whatever element fits in with the theme of your card.You can allow it to jut above the folded edge of your card just dont embellish the top of  your tent card heavily
Swinging Card 7
3 D Decoupaged image
          As a swinging element I 3 D decoupaged the cute honey bee by cutting him and layering using foam dots. Can you see the shiny flower centers and shiny nose and cheeks of the cute bee ? [ courtesy glossy accents] You can choose any swinging style image like a child on a swing  or a  hammock , a bird on a branch etc.Punch holes on either side and attach to the tent card with twine, thread or ribbon. 
Swinging Card 11
Swinging card
       You can actually make the image fit right inside the aperture so that it swings freely to and fro . Since  both my clinic and home printers were acting crazy I had to depend on a printing shop to print  my digital image and I couldn't get my image size a perfect fit but my little bee still swings happily !
Swinging Card  13
Swinging card
Another tip : Do heavily embellish the base of the card like I have done with flowers galore or whatever  you fancy and keep the top relatively simple as otherwise your card will topple over!
You can also decorate both sides of your swinging card like I did in Spinning card tutorial 1 and Spinning card tutorial 2

I hope you like this interactive card which actually doesn't require any fancy tools to make.

Supplies : Spellbinder Classic Leaf ,Spellbinder Rose creations,Cheery Lynn Butterfly,Memory Box fringe, Cheery Lynn Grass,

Fairyland Pop up Card

$
0
0
Pop up Card  1
Pop up Card
Dear friends I am so thrilled with the amazing support on my Swinging card tutorial .
       Also my blog page views just crossed 3 million views [ you can see the counter at the bottom of the blog] with more than 1 lakh [100,000] views per month + I  have reached 1673 followers[each one of you is so precious to me].Also my google plus profile has a crazy 42 million views.
Thank you so much ....I never imagined this little blog would become so popular!
Sharing yet another  interactive 3 D card- a pop up card set in fairy land.
Fairy land pop up card
Pop up card fairy land
I made a multilevel pop up card with a fairy's house complete with a fence ,flowers and  a little pop up fairy flying to her home in this pop up fairy land card
Pop up Card  8
Pop up Card
Little fairy's house is a multilayered 3 D decoupage sticker and fairy land has lots of stamped leaves and punchcraft flowers
Pop up Card  10
Pop up Card
I luckily had a " with love from neverland" sticker which was the perfect sentiment for this pop up card.
Pop up Card  11
Pop up Card
I usually keep the front of my pop up cards fairly simple but did dress up this one with handmade flowers like the one I used in this mothers day card
Pop up Card  5
Paper flowers
The flowers were made by layering several sunflowers,embossing them ,spraying with Lindy's mist and adding chunky glitter to the centers of the paper flowers.
Pop up Card  4
Paper flowers
Here is the card being opened to reveal the pop up card fairy land
Pop up Card  6
Pop up Card
          The card has a total of 5 pop ups- the fairy springs up  by an easy to do accordion fold pop up mechanism [see Pop up tutorial], the glittery corn plants on either side of the house are simple pop up blocks and the pop up house is built on a pedestal pop up [which I lined with cream thai paper to give the appearance of straw]to which I attached the fence, grass and punchcraft flowers!
Pop up Card  7
Pop up Card
Here is the link to a pop up card making tutorial which uses no special tools.
Pop up Card  2
Pop up Card
Pop up cards are the most fun cards to give to a person by hand as its priceless to see their expression change on opening the card! This card made its way to my aunt and niece in Kerala!
Please tell how you liked my fairy land pop up scene.
Supplies :Dies:Cheery Lynn  grass, Cheery Lynn  butterfly,Cheery Lynn  sunflower,Cheery Lynn  fanciful flourish,Spellbinder Classic Leaf ,Spellbinder Rose creations,Spellbinder Lace Hearts ,Memory box corn,Memory box fence,Marianne fence.Punches: Jef small and mini daisy
Linking to BGC [for a child],Imaginations [pattern paper + pearls + butterflies],  Create something Catchy[ pop up card],Time 4 scrap 43[anything ],Wagsnwhiskers 133[anything],Sisteractcard 65,Craftycatz weekly 239[flowers],Aud sentiments 110,Cute card thursday 329 [pretty papers],Charisma cardsz 15[anything],Fantastic tuesday 43[anything]

Getting to Know Me Blog Hop

$
0
0
At Malaysia Aviary
Dear friends Thank you so much for the wonderful comments on my Fairy land pop up card and all the congratulatory messages about my blog crossing 3 million views!
Jaya of My Craft World invited me on a "Getting to know me blog Hop". Jaya makes the most stunning creations...she plays with texture and inks and sprays and literally weaves magic in her creations. I love her layouts , her cards , her altered projects...ooh I could go on and on!! Do pay her a visit...I promise you wont be disappointed!
I am supposed to tell a few things about myself....

Why do I craft and blog ?

I had never realised I was a creative person till I started making school projects for my little girl[she was 2 then] and I actually started this blog [in 2010]to chronicle the kiddy cards and school projects we made.
With my daughter in 2010
Our school projects became a hit in her school as well as on this blog and I started getting emails from all over the world asking for guidance on making particular school projects!
Taj Mahal cardboard model
Taj Mahal School Project
And why do I blog.....I guess the euphoria generated by the comments to a blog post[akin to what I felt when this cutie elephant patted me!] and the friendships formed in blogland keeps me blogging!
In Karnataka Elephant Camp
We all have stresses and problems in life and for me crafting seems to be a wonderful distraction.I firmly believe that whether you are a housewife , a computer engineer or a doctor like myself ...everyone needs a hobby , a little bit of special " me time" to unwind!! Dont you agree?

How does my work differ from others?

I like to experiment in all kinds of crafts  using different media like foam, styrofoam, ceramic,corrugated paper, mseal , felt...[give me some new material and I will try to at least make a flower out of it!!] And I like to dabble in lots of stuff like recycling crafts, jewelry making, 3 D paper crafts, etc
Foam Rose Jewelry set
And I guess I love to share how I made something even though I am not an expert! And what makes my projects really special is when they have input from the little one in the picture!
With my daughter in Coorg

How long does it take to create a project ?

Well the question I get the most from my readers is "how do you get time to craft ?"
Yes time is an issue especially since I am a practising doctor + surgeon and a mom to a demanding little 8 year old! I don't have full time maids or cooks or drivers and yes I have to do the shopping too!! Ha Ha yes I am your average busy bee[ handling myriad fluttering birds !].
With my mom, daughter and hubby- Malaysia
On an average I take at least a week to make a single card and that too using flowers and embellies I must have made earlier and with die cuts I must have cut long back! But I do craft a little bit each day  [sometimes just ten minutes!] as it relaxes me ...it may be just punching or die cutting a few leaves or making a single flower!  And I hardly watch TV---- big time saver!
I often can't craft to a deadline due to time constraints [hence I don't accept regular DT posts] and ha ha this post was supposed to go live yesterday so you know I  often do get into serious time crunches !

Lemme pass the baton on to 2 super talented blogger friends

I am sure most of my readers are familiar with Lisa as her presence in our crafty blogland is hard to miss. She makes such beautiful projects using dies , inks and media.
Lisa's tag
Crafty Blogging is all about sharing and supporting each other and Lisa to me is one of the most wonderful friends a crafty blogger could wish for!
Her work is unique and inspiring and her presence in blog land is such a morale boost to her crafty friends and especially to me as never a blog post goes uncommented by her.
Do vist Lisa  and follow her...you  will have made a friend for life!

Radhika of Hobby Crafts

Radhika started her blog only in 2013 but from her very first blog post she had me intrigued. She combines traditional Indian crafts and modern crafting with such enviable ease and shares step by step tutorials to many many projects.
Radhika's antique lock
She can turn an ordinary lock and key into a work of art , convert a coconut shell into a jewelry box , make an aquarium in a phone case, make earrings out of pista shells....oooh this lady's mind is a crafty wonderland !! And she has become such a supportive blogger friend too...Thank you Radhika for inspiring and being a wonderful blogger pal. Do drop by Radhika's blog....this lady has a big cauldron of creativity you wouldn't want to miss!

Clay Ocean Diorama

$
0
0
Ocean Diorama 2
Clay ocean diorama
       This ocean diorama with a clay mermaid accompanied by a cute clay pet whale , clay crab and numerous clay sea weeds is my little girl's creation.
Ocean Diorama 12
Clay Crafts
          I was in fact somewhat amused when I got an email from Kores Kool Clay asking if my kiddo would be interested in working with Kores clay!! And here I thought people came to the blog to see my work !! 
        I accepted the offer on behalf of my daughter as we had already worked with Kores clay before and I knew she could easily work with it unlike some super sticky brands of clay which she disliked!
         Well little crafter took her designer job very very seriously and even made me take a video of her making the clay mermaid [but somehow me not too comfy about putting her on you tube...what say friends?]!
Ocean Diorama 13
Clay Mermaid
Well here is her mini tutorial in her own words:
1. Make a ball with white clay for the face
2. To make hair-flatten red clay ball with a vessel - quicker than rolling it out as per the expert! Cut it into strip and stick on head
Ocean Diorama 3
Clay mermaid
3.Make eyes with bits of white, green and black bits of clay
Ocean Diorama 4
Clay Mermaid
Steps 4, 5, 6 are missing as I got a patient's call and by the time I got back the little crafter had already made the mermaid's body !For some reason the mermaid's head disliked the body and resisted pushing,squashing, scolding and even the ultimate crafters' fail-safe of gluing so we decided to skewer her together with a broomstick !! [yeah we crafters have to be a bit brutal at times ,don't we?!]
Ocean Diorama 5
Clay Mermaid
As a final touch mermaid got a sequin flower and can you see the tiny "umbilicus" on the cutie tummy ?!
Clay crafts
My little girl recycled an old cardboard box lid  [by painting it blue] to create a setting for her ocean diorama.
Ocean Diorama 6
Clay Mermaid
We placed little mermaid on a real sea shell sofa and according to my daughter little mermaid had just got back from collecting pearls [you can spy the treasure in her  pink clay basket!].
Ocean Diorama 7
Clay flower
My daughter's big red clay flower perhaps bears no resemblance to any aquatic botanical species ...but then we do have artistic license!! We made the seaweeds from green clay and stuck them atop real sea shells.
Ocean Diorama 9
Clay roses
Most clay brands we get here in India dont have the color pink [ a bit weird!] but Kores clay does have unusual popular colors such as black and pink and I couldn't resist contributing the little pink clay rose buds to the diorama.These easy to make clay roses are just rolled up clay strips.Here is a link to a proper Clay rose tutorial 
Ocean Diorama 10
Clay roses
How do you like my daughter's smiley crab and standing seaweed ? She was so pleased she could make the seaweed stand by curving its shape...ha ha imbibed physics lesson ! The corals in the diorama are treasures we  brought  back from a Malaysian holiday[ Oh I do love that country--- its a holiday haven for nature lovers!]
Ocean Diorama 11
Clay crab
We duplicated the orange and velvet sea sponges from the graphics behind the crab into matching clay sea sponges !
Ocean Diorama 8
Clay crafts
Since I have a crafty little girl I  buy a lot of clay and have tried many different clay brands. What we especially liked about the Kores Kool clay is its not sticky , its easy to mould and shape and wont stick to moulds or cutters. And true to their claim of "never drying"...the clay figures remained the same even after a week in our humid hot Indian climate!
Ocean Diorama 2
Clay ocean diorama
I hope you enjoyed seeing my daughter's ocean diorama ...do spare a moment to comment [ She does read the comments and smile from ear to ear when you praise her !!]

Linking to Anything but a card 37 ,Crafty calendar challenge july summertime, Krafty Hands July summer holidays,Brown sugar sea and sand ,Diana's July Linky,Paulaholifield[magical]

Lever Pop up Card tutorial

$
0
0
Lever Pop up card
         I love making pop up cards as its a combination of science and art at work! If you get the science bit wrong [ ie the precision and measuring part] your pop up won't work and if your artistic sense has deserted you even an utterly clever pop up mechanism will fail to impress!!
       Sharing a lever stylepop up card which on opening stands on its own and displays several panels you can literally go to town embellishing! Here is the front of the pop up card with a rectangular window embellished with punchcraft flowers.
Circle Flowers
           Here is the link to the super easy to make Circle flower tutorial .The large red flowers are also made from circles but I used the textured center of a Cheery Lynn Sunflower die to make it.[ Here is a tutorial link to another flower made using Cheery Lynn  Sunflower die: Paper flower tutorial ]
Circle flowers
On opening the card, the central rectangular part swings open like a lever to reveal several pop up panels in an accordion style[ of late I am obsessed with making pop up cards with the accordion mechanism!]
Floral Pop up card
Do allow me to show off the embossed golden Cheery Lynn  butterfly [heat embossing is quite new to me!]
Pop up card
Lots of quilled flowers, stamped leaves and tiny golden butterflies in my pop up butterfly garden!
Garden Pop up Card
This photo shows the pop up mechanism and a glimpse of the inner panel to which I added a floral lattice[ Wild orchid die ]
Lever Pop Up Card
Blogger is acting real spoilsport and degrading the quality of photos on this post! Please bear with me -try as I might I cant get the beautiful pictures of this card to display properly !

How to make a Lever Pop Up Card

I followed a fantastic tutorial by Laura to make my first lever pop up card and loved the mechanism so much I had to try and make "non rectangular" levers , double levers and use a die cutting machine to cut the levers! [ Dont worry you actually dont need the big shot or cuttle bug to make this pop up card ]
Materials Required

  • Card stock- 2 Identical pieces of cardstock- size doesnt matter you can experiment away! Since I was making a circle lever card I wanted a squarish shape and used 2 cards measuring 11 x 6 inches
  • Adhesive- I use PVA glue fevicol MR
  • Something to mark out a Circle - If you are going to hand cut use a lid/ saucer etc which fits well within your card leaving approximately a 1 inch border .If you are die cutting use a shaped die
  • To Cut - if you are going to cut by hand you need a craft knife and a cutting mat / kitchen board. If you want to be lazy or feel good you are exercising your fancy machine [like me!!]- do bring out your big shot/cuttlebug/grand calibur and your shaped dies [avoid ones with fancy edges-plain  circles, squares ,ovals and rectangles are the best]!
  • Optional - Scoring board- I use the scor pal

Lever Pop up card tutorial 

To decrease page load time I have displayed the tutorial photos small. Just click on the photo to see a particular pictorial photo in a larger view. 

Fold the two 11 x 6 inch cards in half and cut out a circular aperture [ you can try other shapes too!] on the front of one folded card.
Pop up Card tutorial  1
Pop up card tutorial 
Insert the open end of one folded card inside the card with the aperture and mark a semicircle onto the inside card along the edges of your aperture. You need not obsess about measuring- just eyeball it and mark lightly.
Pop up Card tutorial  2
Pop up card tutorial 
On the inner card with the semicircle [ the red marks demonstrate my photo editing and not my drawing skills!!] drop down scorelines from the center of the marked half of the card  to meet the semicircle.
Pop up Card tutorial  3
Pop up card tutorial 
The next step is only if you want to use your die cutting machine! 
For hand cutting folks- its easy- just cut the marked semicircle till the center!
Pop up Card tutorial  4
Pop up card tutorial 
        Align  your die bang on the semicircle and apply tape to temporarily secure your die to the cardstock. Place your die + paper sandwich on your platform-cutting plate and place your top cutting plate over the marked semicircle half of your card to just reach the halfway mark [ see pic above].Roll your handle and you will get a cleanly cut  semicircle  still attached to your card.
Pop up Card tutorial  5
Pop up card tutorial 
Fold over the edge of the card to meet the center as shown in the pictorial photo above
Pop up Card tutorial  6
Pop up card tutorial 
Fold over the other edge to meet the center and your pop up lever mechanism is nearly ready. I experimented and made thing more complicated by cutting apertures and making a lever on the other side too [will share that later!!]
Pop up Card tutorial  7
Pop up card tutorial 
The picture above shows how the 2 cards are going to fit together to make a lever pop up card.
Pop up Card tutorial  8
Pop up card tutorial 
This step needs a bit of care to get your pop up to work. Insert your semicircle into the aperture of your front card and apply glue on the folded inner panel as shown above. While sticking down dont align the outer edges but focus on aligning the edges of the semicircle as shown below!
Pop up Card tutorial  9
Pop up card tutorial 
Apply glue on the other folded panel as shown .
Pop up Card tutorial  10
Pop up card tutorial 
To make sure your pop up will work wonderfully, fold over as shown in the picture  above and stick to the outer card.
Pop up Card tutorial  11
Pop up card tutorial 
Your lever pop up card is done. A little complicated ? Yeah I agree but so rewarding when you can conquer it !!I do urge you to try this leverpop up card!
Lever Pop up card
Supplies : Pattern Paper -DCWV, Dies - Cheery Lynn Butterflies, Cheery Lynn Sunflower,Provo Craft butterfly,Spellbinder Classic Leaf  .Stamps- Heartfelt creations leaf
Linking toCreate Something Catchy, Imaginations [ used pattern paper, butterflies and pearls, Cheery Lynn  

Pop Up card Disney Princesses

$
0
0
Pop Up cards 1
Pop Up Card- Princess
         Dear friends Thank you so much for the heartwarming comments on my Lever popup card tutorial . I am not a pinterest fanatic but I was thrilled that the tutorial pinned by Marmosa has gone viral on pinterest clocking 190 + repins in a short time!
Pop Up cards 4
Handmade Pop up card
This is yet another handmade pop up card with the lever mechanism in a kiddy style featuring Snow white amidst lots of handmade flowers.The red roses are made from foam.
Pop Up cards 3
Pop up princess card
I kept the inside fairly simple this time as I wanted the card to close perfectly flat. My little girl has a lot of Disney Princess stickers and any card or project featuring a princess is a "wow" for her and this card will probably be given to one of her friends!

Pop Up card- clouds
I added a small pop up tab on the inside fold of the pop up card  to make my clouds pop out! The silver heart has been punched from glitter foam.

Pop Up cards 2
Pop up card
I hope you like little Snow white swinging around in this pop up card.

Supplies-Dies : Itsy Bitsy rolled daisy, Spellbinder Classic Leaf ,Memory Box fringe, Memory Box spring border, Memory Box cloud, Lifestyle crafts circle, Cheery Lynn  Butterfly, Sizzix butterfly,Wild orchids floral frame, Punches- Itsy Bitsy scallop heart foam Punch,Stamps- Sizzix butterfly, Heartfelt creations leaf.
Linking to :Crafty Sentiments , Die cuttin Divas 176, Everybody art challenge [fav stamps- mine is the heartfelt creations leaf stamp],Fantastic tuesday ,Make my monday[ butterflies],Try it on tuesday[ things with wings],Natalie and Amy [ die cuts and flowers],Ladybug crafts[ summer flowers] , My mum’s craft shop[ summer /bright colors],Dream Valley[ fav color combo – red, white and green ,Craftin by design [ Aug anything goes],,Simon Says,Craft your passion[flower power]

Easy Paper flowers Tutorial

$
0
0
Paper Flower tutorial 2
Paper flower tutorial 
       Dear friends  I think many of us have a special crafty first love - a technique or style we fall in love with at the beginning of our crafting journey--like stamping, quilling , punch craft etc .Well one of my first loves was craft punches
       I would buy whatever punch I could get my hands on and try and cook up different ways to make flowers with a single punch [see Heart punch flower tutorial  , Pear Punch Rose tutorial ,Balloon punch flower tutorial , Easy circle flower tutorial ]!
Flower Punch Board 1
Flower Punch Board tutorial 
         And since I loved punches so much ,I was super excited when Shalini [the owner of Crafter’s Corner] sent me the Flower Punch Board to  play with!Not only is it a super 2 in 1 punch [makes flowers and leaves!!], it comes along with  a scoring tool [super useful bone folder ] and a handy shaping tool [no more hunting for the right pen to shape your flowers!]  too.
Flower Punch Board 2
Flower Punch Board
           Many of you know I usually make all the decorations for my daughter’s birthday parties [see Large Paper flower tutorial ]and I was quite excited that the punch board could be used to make huge 9 inch flowers ideal for party decor!You can actually make 7 different sized flowers ranging from 3 inches to 9 inches diameter
How to make flowers using the Flower Punch Board
There are a couple of videos on You tube demonstrating how to use the flower punch board but I know there are many like me who enjoy pictorials.
The board has tables in cm and inches which indicate what size paper is required to make a particular size flower named XXS,XS etc which has corresponding lines marked on the board.
Flower Punch Board 3
Flower Punch Board
For this basic flower making tutorial I made the smallest 3 inch diameter flower [called XXS] using a 1 3/4 x 6 inch paper strip
Flower Punch Board 4
Flower tutorial 
Making flowers with the flower punch board just involves punching , scoring and folding. To start ,align the paper strip at the vertical groove and punch.Also score along the diagonal line.
Flower Punch Board 5
Flower Punch Board
Shift the paper strip and align to the line of the corresponding flower size eg XXS.Now punch and score both vertically and diagonally.
Flower Punch Board 6
Flower Punch Board tutorial 
Shift the paper and align the vertical score-line you just made to the XXS  line and repeat the punch and score steps.
Flower Punch Board 7
Flower tutorial
Fold your petal strip by mountain folding all the diagonal score lines and valley folding all the vertical score lines.Stick  the petals to make a fairly flat 8 petal flower [ideal for scrapbooks and albums] or  stick one petal over the other to make a 7 petal flower as shown. 
Flower Punch Board 8
Flower tutorial
Shape the petals inwards or outwards using the shaping tool. The shaping tool also has a slotted end like a slotted quilling tool.

Paper Flower tutorial 3
Paper flower tutorial 
You can also snip off petals before sticking to make a more cupped 3 dimensional 6 petal or 5 petal flower as seen in my paper flower bouquet.
How to make Leaves with the flower punch board
You can also make cute perfectly shaped leaves  from squares of paper [ size 1 to 4 inches] by using the reverse punch on the flower punch board.
Paper Leaves 1
Paper leaf tutorial 
Punch opposite corners of a paper square to make a leaf and score it using the scoring tool and score-board to make your leaves 3 D with veins!
Flower Punch Board 11
Paper leaf tutorial 
Making these punch craft paper flowers was so quick and easy I made a whole bouquet of flowers in no time!
Paper Flower tutorial 1
Paper flower tutorial 
         My daughter was fascinated with the punch board and had a go at making the flowers too..I think we'll be making lots of flowers for teachers day!

Tip : The flower punch board works best on good quality paper and thin pattern paper can give slightly ragged petal edges but chart paper worked fine for me!

I hope you enjoyed the basic introduction to the flower punch board . Will soon share how to make Paper Daffodils with the punch board .

PS : the Flower Punch Board is on sale right now at Crafters Corner !

Supplies : Flower Punch Board , Prima Introspection Paper Pad

Linking to Craft for the Craic [ never used flower punch board or the specific prima paper pad before],DL art Aug  Linky,Scrappy Hands 18[Paper Punch],Crafty Calendar August , Suzy Bee's Bloomin Ch 40 ,Divas by design ,Crafty Sentiments ,Bearly Mine Aug , 4 Crafty chicks ,Sister Act card 68 , Cards Galore Aug ,Crafty Hazelnuts Pattern Paper Aug , Creatalicious Monochrome [voting aug 15 -30],Mema's crafts Aug ,Reves 2 scrap Aug , As you like it [ Fav papers are Prima  because I love the beautiful  designs and colors in each pad] ,613 Avenue 83 , Crafting By designs Aug, Craft Your Passion 224[ flower power],Fantastic Tuesday 46 ,Crafty Girls 23 , Simon Says Stamp , Scribble and scrap crafts 24 , Tuesday Throwdown [ other than card or tag],

Paper Daffodil Flower tutorial

$
0
0
Paper Daffodils 1
Paper Daffodils tutorial 
         Dear friends Thank you so much for the heartwarming response to my Easy Paper flower tutorial using the flower punch board.Sharing yet another paper flower tutorial- this time cheerful summery Daffodils.
Paper Holder 1
Paper Holder
       I altered this box into a paper/ magazine holder to store some of my A 4 papers but my daughter has laid claim to it as she wanted the " magic " Daffodil flowers!!
Paper Daffodils 2
Paper Daffodils 

        In the picture above you can see the dimensional nature of the paper daffodils.Since I didnt have any pretty yellow paper I stamped and embossed regular chart paper to make my own pattern paper to create the  Paper Daffodils.

Paper Daffodils 4
Paper Daffodils
       The leaves were hand cut ,inked with distress ink, stamped with the same flourish stamp I used on the flowers and embossed.I couldn't resist adding a favourite Cheery Lynn  Butterfly to keep the flowers company!
Paper Daffodils 5
Paper Flower tutorial 

How to make the Paper Daffodils

Materials
  • Flower Punch Board- Read more about it here: Easy flowers with Flower Punch Board
  • Paper - good quality pattern paper or card stock ideal to get clean cuts with the flower punch board but you can also use chart paper like I did here
  • Glue& Scissors
  • Optional : Stamps , Inkpads , Embossing Powders , Diamond dust
If you are not familiar with the flower Punch board please read this tutorial first : Easy flowers with Flower Punch Board
  1. Take a 2 x 5 1/4 inch strip paper and punch a paper strip like you would do for a XXS flower but don't score the diagonals and only partially score the vertical scores as shown. 
    Paper Daffodil tutorial 
  2. Align the tips of the petals to the " S " line and score the strip. 
    Paper Daffodil tutorial 
  3. Bend the strip at the score line and snip off wedges as shown.
    Paper Daffodil tutorial 
  4. Ink your petals if you desire and apply glue on one petal and stick to form a cylinder.
    Paper Flower tutorial 8
    Paper daffodil tutorial 
  5. Apply glue on the folded wedges and stick on a  7 petal 4 inch diameter flower [XS flower] made with the flower punch board.
    Paper Flower tutorial 9
    Paper flower tutorial

  6. Use the slotted end of the shaping tool to gently evert the inner tube petals
  7. Make and stick a fringed paper flower to the center .I used a Tim Holtz Sizzix fringe die to make the fringed center of the flower but you can easily handcut a fringed flower like I did in this Large Paper Flower tutorial .
Paper Daffodils 3
Paper Daffodils
            My young daughter helped to further jazz up the flowers with Diamond dust and she has nicknamed our shimmery daffodils as "Magic Flowers" !
I hope you like our Magical Daffodils!
Supplies :Flower Punch Board [ Crafter's Corner],DCWV Botanical Stack, Dies : Cheery Lynn  Butterfly, Tim Holtz Sizzix Tapered Fringe Die,Stamps:Inque Boutique flourish Stamp,Inkpads: Wild Honey Distress Ink,Versamark Watermark Inkpad,WOW Embossing Powder,Diamond Dust
Linking toAll sorts 270 Aug 8[My Favorite things are- Making flowers, altering projects, Cheery Lynn   Butterfly,DCWV Botanical stack papers] ,Craft for the Craic Aug [Never used diamond dust before] ,As you like it Aug [ Fav papers are DCWV Botanical stack as I love the floral theme designs in it],Cheery Lynn Challenge ,All crafts  Aug[ no cards],Our Creative Corner Aug [summertime],Bearly Mine Aug, Crafty Boots Aug 17 [flowers],Love to create  127 Aug 10 ,Reves 2 scrap Aug,Melon Headz Friends Aug [ flowers],My craft spot[ bright summer colors],Sparkle and Sprinkle Aug [ glitter, embossing powder],Stamp and Create Aug,Through the purple Haze [Summer] Aug 10,Glitter N sparkle 96 Aug 9,Scrappy Hands  18 Aug [Paper Punch],Pink Gem Challenge 125 Aug 15 [ embossing],Mema's crafts Aug, Natalie and Amy Aug [die cuts and flowers],Tuesday Throwdown 207 Aug 13[Mellow Yellow],Simon Says Aug 6, Totally Gorjuss 247 Aug 9 [ flowers],The House that stamps built DCC 730 Aug 13[ glitter, sparkle],The Pink elephant 262 Aug 11,Milk Coffee Aug 15[ 2 or more die cuts]

Boat Pop Up Card Tutorial

$
0
0
Boat Pop Up Card 2
Boat Pop Up Card Tutorial
        When I started card making ,I loved making pop up cards as you didnt really need many supplies to make them and even a simple card had a WOW factor !Now that I have more crafty stuff to play with I am trying to incorporate techniques like die cutting, dry and heat embossing into pop up card making!This Boat pop up card is called a 180 degree pop up card as the pop-up mechanism becomes truly 3 D on opening the card flat at 180 degrees!
Boat Pop Up Card 3
Boat Pop Up Card Tutorial
          I made the background of my pop up card by using distress inks and heat embossing  the same flourish stamp I used in the Paper Daffodil tutorial  [Ha Ha I don't own that many stamps!]
Boat Pop Up Card 4
Boat Pop Up Card Tutorial
Here is the pop up card being closed completely flat.
Boat Pop Up Card 5
Boat Pop Up Card Tutorial
         I kept the front very simple , just added 2 pattern papers [following a sketch from Die cuttin Divas], 2 starfish and a heat embossed " 9 lives" [ my first stamp - a gift from blogger pal Romina and which I confess I am using for the first time!]
Boat Pop Up Card 1
Boat Pop Up Card Tutorial
          I know many card makers shy away from making pop up cards but I am especially encouraged by the enthusiastic response to my  Lever Pop up Card Tutorial and hence sharing a step by step tutorial to make this Boat Pop up card ---trust me though it looks complicated it's much easier than the Lever Pop up card tutorial !!
I designed this pop up card based on mechanisms from Duncan Birmingham's Pop up design book
Pop up card tutorial 1
Pop Up Card Tutorial
The whole mechanism of the pop up card  is based on the central pop up box you create. Take 2 card strips 4 x 1 1/2 inches and score at 1/2, 1 1/2, 2 1/2 , and 3 1/2 inches.Snip off triangles on the 1/2 inch parts on the sides to create gluing tabs as shown in the pictorial above. I trimmed the tabs to make them less than 1/2 inch to make gluing easier.
Pop up card tutorial 2
Pop Up Card Tutorial
Fold the strips at each score line and apply glue to one tab and stick firmly to the center fold of a folded A 4 card as shown- the tab should align perfectly snugly with the center and give enough time for it to dry.Now fold the strip to the opposite as shown, apply glue to the tab and fold the card closed.
Pop up card tutorial 3
Pop Up Card Tutorial
On opening you will have created a pop up box mechanism!You can glue on a central shaft for the ship's masts if you wish to the vertical surface at the central fold
Pop up card tutorial 4
Pop Up Card Tutorial
Fold the other card strip and apply glue to the tab and adjacent part as shown and stick to the central fold line and the vertical surface of the pop up box you had already created.
Pop up card tutorial 5
Pop Up Card Tutorial
Fold over the whole pop up mechanism to the opposite side, close the card and allow enough time to dry. On opening voila your central pop up box is complete.
Pop up card tutorial 8
Pop Up Card Tutorial
To make the sides of the boat is even easier.Take 2 card strips [I challenged my pop up making skills by embossing the strips in wood grain --embossed cards are always more difficult to stick!] 5 3/4 x 1 3/4 and 6 3/4 x 1 3/4. Make gluing tabs by scoring and snipping off triangles on the outer 1/2 inches of the longer strip.If you wish you can cut off some bits from the top of the strips to give a gentle curve like I have done here in my pop up ship design.
Pop up card tutorial 6
Pop Up Card Tutorial
Stick the central part of the shorter strip onto the vertical surface of the central pop up mechanism.Apply glue to one gluing tab of the longer strip and stick to one end of the shorter strip as shown - you will have formed the bow [front part] of the ship!
Pop up card tutorial 7
Pop Up Card Tutorial
Apply glue on the vertical surface of the central pop up mechanism and the other gluing tab of the long strip and stick as marked by the arrows in the pictorial.
Boat Pop Up Card 6
Boat Pop Up Card Tutorial
Your pop up card is ready. The key to success in making this pop up card is not being impatient while sticking the parts and giving enough time for the glue to dry!
I hope you like my pop up ship design-- inputs needed!
Supplies : Dies:Elizabeth Craft Happy New Year,Spellbinder Curved Borders 2 ,Spellbinders Majestic Labels 25,Spellbinders Banner Basics 2,Embossing Folder- Spellbinder Woodgrain folder.Stamps:Inque Boutique flourish Stamp,[from Jessica Shelton], Alley Cat 9 Lives stamp [from Romina Nahata]Inkpads: Distress Ink peeled paint, tumbled glass, peacock feather,Versamark Watermark Papers:DCWV Home spun, Floral foliage recollections.Other:WOW Embossing Powder Silver Bells,
Linking to Die Cuttin Divas 177 ,BGC [Nautical],Always something creative 80 Aug 15,Bearly Mine Aug , Cards Galore Aug ,Crafty Hazelnut's PatternPaper Aug,Mema's crafts Aug ,Reves2scrap Aug ch 3 , Sarah Hurley 365 Aug[ Fav thing- My fav is pop up card making],Sisters of Craft Aug, WOW Embossing Aug[Monochrome],Alphabet Challenge M for Men ,Milk Coffee Ch [2 or more die cuts],Crafts 4 Eternity 188 Aug 15,Cut it Up Inspired by a song [ My song : Row Row Row Your Boat!!],Little Red Wagon [Embossing],Simon Says Make it Sparkle

Mummy and Me !

$
0
0
Mummy Crafts 1
Mummy and Me !
        Dear friends I know some of you remember that we had an Egyptian theme Birthday party for my daughter's 8th birthday [see Scroll Shaped Invitation Card and King Tutankhamen Picture Frame tutorial ].The Egyptian Mummy prop we made was the big star of the party - not only did my daughter have days of fun making it- I think we made memories for life!
Mummy Crafts 2
How to make an Egyptian Mummy
I dont know how useful our Mummy making steps will be to you -  maybe it will come in handy for a school project or a party or ......just sit back and enjoy a little girl's enthusiastic preparations for her birthday party!

 Here is How to make your own Mummy

Materials Required
Newspaper- lots and lots!
Cellotape--lots and lots!
Tissue paper rolls - one
Gauze - from our clinic! - 2 to 3 rolls
Little helper-such as shown below -essential  for success of project!
Mummy Crafts 4
Mummy Crafts
Roll up lots and lots of newspaper to make the body, hands and feet of the mummy.Stick the rolls with cellotape
Mummy Crafts 3
Mummy crafts
Scrunch up more newspaper to make Mummy's head.Make a big mess in the kitchen and forget about cooking!
Mummy Crafts 5
Mummy Crafts
Recall /discover special surgical skills to fit Mummy's head to body !

Mummy Crafts 6
Mummy and Me !
Test out Mummy's joints by having the birthday girl dance with him!
Mummy Crafts 11
Egyptian Mummy Crafts
Beautify Mummy with lots of tissue paper + sticky tape
Mummy Crafts 10
Mummy Crafts
     Perform a bit of orthopaedic manoeuvring to improve Mummy's height ----if the birthday girl demands Mummy has to be exactly as tall as her even to the nearest centimeter!
Mummy Crafts 8
Egyptian Mummy
If height matching doesn't quite succeed ,distract birthday girl by taking Mummy out into the garden to get acquainted with the dog !
Mummy Crafts 9
Egyptian Mummy 
Convince little girl that best friends are not always the same height!
Mummy Crafts 12
Mummy Crafts
Give Mummy a  gauze roll over to make him more handsome + stronger so that he would survive the birthday party with dozens of little girls and boys inspecting him!
Mummy Crafts 13
Mummy and Me
Let the birthday girl make cute eyelashes and eyes for her Mummy! And the Mummy is ready to Party!
Egyptian themed Party
So here is Mummy sitting in our hall near King Tutankhamen's picture with the Golden Birthday Banner awaiting the arrival of guests!
Egyptian themed Party
And that's the birthday girl posing in front of her Pyramid [we made it from chart paper and painted it Gold], Hieroglyph Stone which spelt her name [made with salt dough], homemade Birthday banner and the Mummy!
Mummy Crafts 14
Egyptian Mummy
My little girl became quite attached to her Mummy giving her a big " Umma" [ translates to Kiss] !
Our Mummy was a big hit at the Party and the kids even had a "dance with the Mummy"session [which mummy survived]!!
Hoping our Mummy could bring a smile to your day!

Felt Flowers in Sunny Layout

$
0
0
Sunflower Layout
         Dear friends I am so overwhelmed at the kind comments on the Mummy and Me post ...Thank you so much ! Sharing a simple summery layout I made for a swap with crafter friends in my city Bangalore--I somehow don't scrapbook much [Made only 3 layouts so far ! : Tulip tutorial ,Interactive Scrapbook, Foam in Scrapbooking ]but had to rise to the challenge as I didnt want to miss out on meeting my crafty friends !

Felt flowers
I love the Cheery Lynn  Sunflower die [ more projects using it : Fairy Land Pop up Card , Paper and Sola Flowers, Paper Flower tutorial, Paper Flower Romance ] and used it to make these felt sunflowers.I layered 2 sunflower diecuts atop each other and added chunky glitter to the center. The edges of the felt sunflower petals sparkle as I added diamond dust too. And I couldn't help adding ny Heartfelt creations leaves[ You can see them on most projects I make these days!!]Made a 3 D vase using the Wild rose floral frame die which I heat embossed after inking with distress ink.
Heat Embossing
Though I have been crafting for 4 years ,I only bought a heat gun recently so this layout has a lot of heat embossing! The Die cut frame for the photo was inked and heat embossed - I love the sparkle clear embossing powder gave the frame.Added golden liquid pearls in random on my embossed frame. In keeping with the theme added the word " Sunshine" in gel stickers.
Heat embossing
The theme of the layout was "colorful" so made my heart tricolor .I love to look at scrapbook layouts with fabric so added a crinkly ribbon bow and a bit of recycling too ![The 2 white berries on a branch were salvaged from an old earring !]. The " love " on both the heart and the journal mini card were stamped and heat embossed!
Distress Inks
       Made a Journalling mini card in the same tricolor color scheme using  a Wild Rose floral frame die sent to me by blogger friend Kate.I felt particularly pleased with the twine bow on my journalling card--how is it folks?[ I rarely attempt bows or work with twine!]

Cheery Lynn  Butterfly
Added a golden Cheery Lynn  Butterly inside the journalling card
Felt Sunflowers
I always feel like a smug cat when I can recycle something unique ! The sparkling crystal stone stems of the sunflowers were salvaged from an old dress !
I seem to be in love with yellow of late- there is something so cheerful and summery about it!
I hope my layout has not come out too badly and I hope my swap partner likes it ---input needed!

Supplies : Dies : Spellbinder Majestic Labels 25 , Spellbinder Classic Leaf ,Spellbinders Shapeabilities Lace Hearts,Cheery Lynn  Butterfly , Cheery Lynn  grass,Cheery Lynn Sunflower , Poppy Stamps swirly curl border, Wild Rose Studio Floral frame;Paper : DCWV,Stamps: Heartfelt creations leaf, Kaisercraft Porcelain Rose,Embossing : WOW embossing powder , Ranger Heat gun .Misc : Liquid pearls [Crafters Corner]
Liking to Colette's Cosmic Challenge 4

Crafts 4 eternity 189 [ Something Old - my alpha stickers are nearly 3 years old and the recycled earring must be nearly 10 years old!!], Craft for the Craic [ Never used liquid pearls before],Cheery Lynn [words – Sunshine and Love], Simon Says [Summer],Aud Sentiments 113 [ my season is summer and sentiment is sunshine],Crafters Cafe 76,Crafty Creations 269 [ flowers],Handmade Harbour[ summer],Paper shelter 169[punches, dies],Penny’s challenge 190, Scrappers Delight 129 [ die cuts],613 Avenue Crafts [ Summer],Szmek 18 [ twine and ribbon],Crafts Galore encore Aug , Natalie and Amy Aug [ die cuts and flowers],Brown Sugar challenge 107 , Sweet stamps 182 Aug 18[ in the garden], Eclectic Paperie Aug [ Embossing ], Crafty Boots Aug 17 [ flowers],Fantastic tuesday 48 Aug 18, Melonheadz Aug 18 [ flowers], Bunny Zoe's Sept 7 [summer colors]

Easy Paper Basket Tutorial

$
0
0
Flower Basket tutorial 7
Paper Basket Tutorial
           Hi friends Thank you so much for the supportive comments  on my Felt flowers layout - I hardly scrapbook so each and every feedback was so important to boost my confidence!
        This month I am reviewing the  Flower punch board for one of my favourite Craft supply stores Crafter’s Corner and I wanted to try out different projects to make with this punchboard
Here are links to 2 projects I had already shared using this new type of Punch board
          Some ideas are "accidental" discoveries and when I found that the 7-  petal flowers made with the Flower punch board tend to stand upright , that gave me the idea to make flower baskets with them.
Flower Basket tutorial 5
Paper Basket Tutorial

These Paper Baskets are quick and easy to make and will look good as home decor or party favours. I can just imagine filling up the baskets with little trinkets or candy as return gifts!

How to make easy Flower Baskets

Materials Required
Flower  Punch Board - manufactured by We R Memory Keepers
Flower Punch Board
Glue , Scissors
Pattern Paper /Chart paper and Cardstock
Optional - Ink pad to ink the edges of your flower petals ,Stamps ,Embossing powders to jazz up your paper even more

If you missed the Easy flower making tutorial do read it first as I don't want to repeat the basic steps of how to use the flower punch board again.
Flower Basket tutorial
Punch and accordion fold a  5 inch flower [S ]flower and 3 inch [XXS ]flower. The shimmer on the flowers is because I stamped and embossed the paper strips before making them into flowers
Flower Basket tutorial
Make a 7 petal flower from the  5 inch flower folded strip and curve out the edges using the shaping tool included in the Flower punch board
Flower Basket tutorial
The flower can stand upright like a basket but to make it  sturdier  you can add a cylindrical base for your flower basket .Fold a 7 x 1 1/4 inch paper strip in half lengthwise[ you don't have to exactly follow this measurement-- I liked the shape this set of measurements gave!]. Glue the ends of this strip to get a paper ring. 
Flower Basket tutorial
Glue this paper ring base on to the under-surface of the flower.You need to be quite generous with the glue in this step and be patient to let the glue dry while holding the parts!
Flower Basket tutorial
Make a 7 petal 3 inch diameter flower following the Flower punch board tutorial and stick it inside your larger flower. If there is still a gap in the center add a punched circle to the center.
Flower Basket tutorial
Make a handle using matching card stock - again no hard and fast rules about the measurement [I used 11 x 1 inchstrip] and taper the ends as shown in the pictorial above to allow easy gluing into the basket.
Flower Basket tutorial 3
Paper Basket tutorial 
I inserted the tapered ends of the handle under my smaller flower [ better to glue on the handle before you glue on the smaller flower!]
Flower Basket tutorial 2
Flower Basket tutorial 
The picture above shows the Flower basket on its stand. I couldn't resist adding a Resin flower on the handle of my flower basket!
Resin Flower
Adding the resin flower tended to make my basket topple over [Oops!!!]
So salvaged the project by adding a bouquet of flowers to the basket!
Foam flowers Mulberry Flowers
Poked foam flowers [ these are store bought ones but here is the handmade foam rose tutorial link], mulberry flowers and pollens [ these are normal pollens dressed up with floral tape] into play-dough [ instead of floral sponge!!] and added them inside the flower basket.
Flower Basket tutorial 8
Paper Basket Tutorial
Using the same tutorial steps you can make baskets as large as 12 inches in diameter using the flower punch board!
I hope you enjoyed the easy basket tutorial ....do tell me how it is.
Supplies
Flower Punch Board,Embossing : Versamark Watermark , WOW Embossing Powders , Ranger Heat Gun,Dies:Spellbinders Floral Oval ,PoppyStamps Swirly Curl border,Embellishments : Resin Flowers [from Crafters Corner]Paper : DCWV Floral stack
Linking to
613 Avenue create 85 ,Judy's Monday Handmade Linky, Squirrel and Fox 75 Aug 21, Diana's Aug Linky

Stamping Fun !

$
0
0
Stamping Fun 3
Stamping
            Dear friends this is just another fun post to share my little girl's stamping. You will be wondering "Oh so Dr Sonia is teaching her daughter to stamp?!" Well.....its the other way round... I have a somewhat cowardly bad habit of not wanting to try something unless I know " all about it !!" [Anyone there with the same traits....?] My daughter on the other hand has to play with a new craft supply the moment we get it!!
Stamping Fun 1
Stamping Fun
This stamped musical show is my 8 year old's work...her sketch pens acted crazy according to her so the smearing in parts [ She has not yet heard of copics so I am saved for now!!]
Stamping Fun 2
Stamping Fun
Here is a photo to make you smile!! How many of us look so happy with our crafty projects!!
PS : my dashboard has been acting real crazy and so I 'm having difficulty in catching up with blogs---I'm able to drop by friends who leave comments.I hope blogger acts better real soon!!
Please do leave some encouragement for my little girl
Linking to Simon Says StampCrafty little Fairies Aug[ cute and cuddly],Creative moments 49 Aug 25[ animals] , Clear it out [stamp set used had been with us nearly 2 years now!],Sweet stamps 183 aug 25, Tuesday throwdown Aug 25 [ furry friends],Crazy Challenge Aug [ cute animals]

Handmade Paper Basket Tutorial

$
0
0
Handmade Paper Basket
          Dear friends Thank you so much for the sweet encouraging words on my daughter's Stamping Fun post -- blogger friends are the best !! My little girl sat on my lap and read each and every comment last night! She was beaming!
Now back to big girls' fun - sharing yet another easy paper basket made with the flower punch board.
Paper Basket tutorial
        My paper basket is decorated with 3 butterflies which were stamped and heat embossed in sparkling gold embossing powder.Added gold liquid pearls to the center of the butterflies and added some sparkling gold and diamond chains [ recycled from a torn dress and also  used in the Felt Sunflower layout]

How to make a Paper Basket

       I was so encouraged by the wonderful comments on the Paper Basket tutorial I shared earlier. This version of the paper basket is actually quite roomy and can be made in different sizes using the flower punch board. The basic idea is the same as the Paper Daffodils tutorial  
Materials Required
  • Flower Punch Board -If you dont have a flower punchboard you could even free hand cut the scallops and follow the rest of the tutorial steps.
  • Scissors, Glue
  • Pattern Paper / Chart Paper , Card Stock
  • Optional : Punches, Dies, Embossing powders and Stamps to embellish your basket
Take a 12 x 3 inch Pattern paper / chart paper and punch  out a strip aligning the score lines at “S” mark on the flower punch board.Score only the straight lines, don't score the diagonal lines at each punch.
Paper Basket tutorial 
 You will get  a 8 petal  scalloped strip as shown
Flower punch board tutorial 
On the reverse side of your punched paper strip , score at 1 inch from the straight border using the flower punch board or a scoring board such as a Scorpal. If you are using the flower punch board line the scalloped edge roughly midway between the “L” and “M” marks on your flower punch board and score.
Flower Punch board tutorial 
At this stage if you wish you can further jazz up your paper strip by stamping and embossing like I did using a flourish stamp and sparkling snow WOW embossing powder.You can also add further interest to your paper basket  by inking  the edges of your petal strip using your favourite inks .
Paper Basket tutorial 
Once you have inked, embossed or glittered up your punched paper strip ,fold the strip at the score line as shown above
Paper Basket tutorial  3
Paper Basket tutorial
Cut on the vertical score lines to reach the folded line just like you did for the paper daffodil tutorial [ but no need to snip off triangles this time].Curve and fold the paper strip and stick the last two petals together
Paper Basket tutorial  4
Paper Basket tutorial
You will get a 7 petal cup shaped flower when you evert  the petal edges using the shaping tool of your flower punch board [ you can also use your fingers to evert the petal edges].
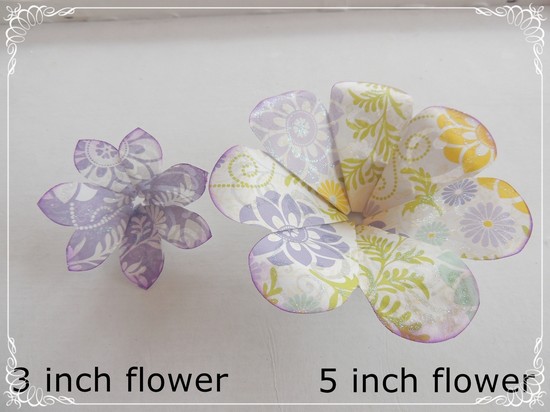
To close the gaps in the center and convert your flower into a basket ,either stick a circle on the under-surface or within the flower cup or add a punch-craft flower like I did.You can make a 3 inch diameter “ XXS” flower using the flower  punch board and stick it to the center of your cup shaped flower to make a flower basket.
Paper Basket tutorial  6
Paper Basket tutorial
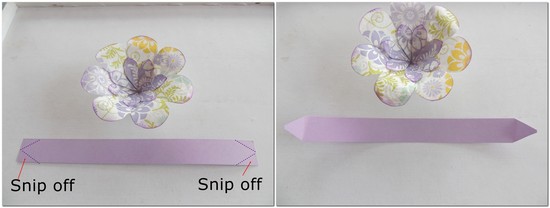
Your flower baskets are actually ready. If you like baskets with cute handles  you can have even more fun designing fun handles for your handmade baskets
Paper Basket tutorial  7
Paper Basket tutorial
 I used a 10 and 3/4 inch x 1 inch pattern paper ,inked the edges and added a poppy stamps swirly curve die cut  on it and stuck it inside my flower baskets.

Paper Basket tutorial  8
Paper Basket tutorial
Here is the finished basket with sparkling gold embossed butterflies and golden chains.Love how the light reflects from all the gold!
Handmade Paper Basket
I had lots of fun trying out different ideas on the basket handles.On this cheerful orange yellow version of the  paper basket I added a Martha Stewart punched pattern paper strip and a pom pom centred flower made using the flower punch board.
Paper Basket 1
Handmade basket
Stuck the flower basket on a larger flat version flower again made using the flower punch board. Since I used green pattern paper to make the larger flower I think it looks like leaves dont you think!
Handmade Paper Basket
This has been a super long post but I didnt want to miss any detail so that anyone wishing to try making their own paper flower baskets would find it super easy!
Handmade Paper Baskets
          I hope you enjoyed this tutorial --from the comments to my previous posts I understand the flower punch board is a fairly new crafty tool and not many have it but the main purpose of this tutorial is just to give some fun ideas to create a 3 D basket plus give enough details to help those who already have / are planning to buy the  flower punch board !
Do tell me how it is...hopefully didn't put you to sleep!!
Supplies
Punches : Flower Punch Board [ from Crafter’s Corner],  Martha Stewart Daisy,Martha Stewart  Vintage floral, Martha Stewart  Double arches
Dies : Sizzix stamp and die-cut Butterflies 657773 , Poppy Stamps swirly curl border
Stamps : Hero Arts Butterfly, Inque Boutique Monarch
Embossing : Sparkling snow WOW embossing powder, Metallic Gold sparkle WOW embossing powder, Ranger heat gun
Papers : DCWV Fresh floral stack, DCWV Four Seasons,DCWV Day to day Photo real stack,
Misc : Gold Liquid Pearl [ from Crafter’s Corner]
    Linking toPDE Linky Sep 1 [dies or punches], Hobby Cutz challenge [ my favourite type of challenges are 3 D papercrafts and Flower themed challenges],Simon Says ,Diana's Picnic challenge [ Hope baskets qualify],Crafting for all seasons 84 [ monochromatic],Inky Impressions 173 Aug 26,Kraftin Kimmie Aug 26 , Butterfly Challenge

    Fairyland Tutorial

    $
    0
    0
    DIY Fairyland 1
    Fairyland Tutorial
             Dear friends this DIY fairyland is the finale to my flower punch board project series [I have thoroughly enjoyed reviewing the flower punch board for Crafters Corner...Thank you Shalini!].
    Can you guess the elements made with the flower punch board ? If you had read my earlier posts  I bet you could !
    In case you missed them, here are the posts featuring the flower punch board :
    Fairyland tutorial  4
    Fairy tutorial 
    The fairy home roofs, the fairy dresses and the fence around fairyland were all made with the flower punch board! 
             I built the fairyland on an old cardboard box [recycling!] and lined it with pattern paper which was stamped with flourishes and embossed in clear sparkle embossing powder.To further jazz up the fairy fantasy world , I sponged the pattern paper with dark green ink in patches and added bits of die cut grass all over fairyland.
    Fairy Furniture 2
    Fairyland Furniture
    Made some mini fairy furniture using Spellbinders dies [ the bench is made with the Spellbinders Majestic Labels 25 and the little " teapoy" using the Spellbinders decorative labels 28]
    Fairy Furniture 3
    Fairyland Tutorial
    The little teapots are cute bronze metal charms from Crafters Corner!

    Fairy Dress tutorial 

    Materials required
    1. Flower Punch Board - alternate is hand cutting but flower punch board makes it super easy as the pleats are all pre-scored and you can make a perfect skirt!
    2. Pattern Paper / Chart paper/ Card stock- you can doodle ,ink or emboss your paper to make super pretty fairy frocks!
    3. Little dolls - you can use different sized dolls even a Barbie! - just change the paper size and punch site accordingly [ eg XXS, XS,S etc on flower punch board] 
    4. Glue
    Fairy tutorial 
           I had sprained my neck last week and my little girl helped to make this fairyland! Here you can see her using the flower punchboard to make the fairy dresses!We made dresses for these little dolls by punching out a 6 x 1 3/4 inch paper strip as you would for an XXS flower [ see detailed steps here : Easy Flower Making tutorial]
    Fairy tutorial  4
    Fairy tutorial 
    Accordion fold the paper strip and wrap around the little doll's waist.Stick the edges of the last 2 flower petals together and optionally add bits of glue in between the pleats and your fairy dress is ready!
    Fairy tutorial  2
    Fairy tutorial 
           My daughter's current favourite color is blue and this little blue fairy was made by her. The fairy wings are butterflies stamped and heat embossed on parchment paper and my little girl had a go at parchment craft by embossing on the fairy wings [ See Basic Parchment Craft tutorial ]
    Fairy House 3
    Fairy tutorial 
    This purple fairy has embossed and water-colored fairy wings. I made an arched doorway to fairyland using Spellbinders label 25 dies [same one used to make the fairy furniture] and hung dangling crystals on it. Added a tiny flower pot with magical handmade beaded flowers and silver glitter foam leaves!

    Fairy Home tutorial

    These fairy houses are super easy to make and by varying the paper strip size you can easily make houses in different sizes
    Fairyland 3
    Fairy House tutorial 
    Make the roofs first 
    The roofs for the fairy homes are made the same way like the fairy dresses but I used the next size on the flower punch board and punched out  a 9 x 2 1/4 inch paper strip [as for an XS size flower] . 
    Once your paper strip is punched, fold and stick into a conical shape just like in the fairy dress tutorial  to get the fairy house roof. If you want you can add glue on the pleats or let it be for a tiled roof appearance. Add a crystal , bead or flower to close the small gap left at the center of the roof.
    Fairy House 1
    Fairy house
    Make the walls:
             Make any size cylinders using corrugated paper or cardstock and hot glue to your flowery fairy home roofs![Tip : if are making cylinders for any 3 D project corrugated paper is your sure fire choice as its so easy to curve it!]
    I wanted to give a  tree-house feel so added the houses atop wood colored corrugated paper discs placed on cylindrical "tree trunks" .
    The purple roses on our tree houses are handmade foam roses [ tutorial link  :Foam rose tutorial ]
    Fairyland tutorial  2
    Fairy land
           Made a faux wooden sign board with roses and pearls twining around it and housing a magical bird nest! The diamond chain was salvaged from an old dress of mine![ you can see it in the Sunflower layout too]
    Here are more ideas to jazz up your fairy houses
    • Emboss cardstock using woodgrain or tiles before you make them into cylindrical walls
    • Add lots of glitter
    • Add crystals, pearls and charms
    • Cut out windows and doors and add a tea light inside to light up your fairy house
    • Make your fairy homes into functional boxes by adding a base!

    Fence tutorial 

    Fairyland tutorial  1
    Fairyland Tutorial
    Fences are one of my favourite elements to use in creating dioramas [see Beaded Christmas tree diorama] and scenic cards. You could use a fence punch , fence dies or even handcut fences if you have the patience! I used a Marianne fence die around the pink butterfly fairy house and a Memory box fence around the purple house.
    Fairy Furniture 1
    Foam flowers
    The limitation with regular fence punches and dies is that they come in one size only --with the flower punch board you can make any size fence customized for your project!
    Flower punch board tutorial  1
    Fairy land tutorial 
    I punched a paper strip aligning at XS to make the fence for my fairyland. Then embossed the strip  in woodgrain texture [ using a Spellbinders folder] and inked the fence in patches.
    Flower punch board tutorial  3
    Fence tutorial 
    You can use the paper strip as such or cut out individual picket fences like I did for my fairyland!
    Fairy House 2
    Foam flowers
           Here is the fence with grass and foam flowers with stamped and Heartfelt creations die cut leaves and in the background you can see a cute mini metal harp [ another charm] which I set on an embossed flower table for the little fairies to play!
    Fairyland tutorial  3
    Handmade Fairyland
    The pink, purple and yellow daisy style flowers are all foam flowers made using the Cheery Lynn  Sunflower die [ tutorial link : Daisy tutorial ].Here are links to making some of the beaded flowers in our magical land: Beaded flower tutorial

    Phew that was a super long post but I hope you enjoyed your journey through fairyland....do tell me how it is!

    Supplies
    Flower Making : Flower Punch Board[from Crafters Corner]
    Embossing : Versamark Watermark , WOW Embossing Powders, Ranger Heat Gun
    Stamps : Hero Arts   Butterfly Stamp, Heartfelt creations bold leaf stamp ,Inque Boutique Monarch
    Dies: Cheery Lynn Butterfly,Cheery Lynn  Flourish leaf strip, Cheery Lynn  grass,Cheery Lynn  sunflower,Heartfelt creations leaf ,Memory Box rounded fence ,Memory Box fringe, Marianne Anja Leaves 3 ,Marianne fence, Sizzix BigZ Tim Holtz hanging Sign,Sizzix Butterfly , Spellbinders majestic Labels 25
    Papers: DCWV ;Misc tools - Crop a dile Big Bite
    Misc Embellishments : Charms [from Crafters Corner]

    Linking to Come and Get it sep 6 [ things with wings],Dragonfly dreams 8 , Sep 7 [ Inspired by a book- my project is inspired by fairy tales! ], Pile it on [ Punch it out], Dream valley 89 Sep 6 [ flowers],Totally Gorjuss 251 [ pearls],Wednesdays creative inspiration 278 sep 3[ flower power],Simon Says Wed ,Brown Sugar Ch 109 ,Scrapbook Blessing Club 28 Sep 6,Squirrel and the Fox sep 5 [ summer/ spring] ,PDE Linky party Sep 1 [dies and punches ] ,Tuesday Throwdown 210 Sep 1 ,Little red wagon 252 [ Girl Power],Crafting at the weekend Sep, Art by Miran 13 Sep 4, Bunny Zoes crafts Sep 7[Summer colors],Creatalicious 66 Sep 14 [ up to the sky],Frosted Designs Sep 9[stamp],All crafts Challenge Sep

    Edited : this project came top 3 in Crafters Cafe Punches and Dies theme

    Easy Beaded Flower Spray tutorial

    $
    0
    0
    Beaded flower tutorial 2
    Beaded Flowers Box
           This Baby themed box is my guest DT project for Tuesday Throwdown. I generally shy away from working with digital images as I am not very patient at coloring images but when the super talented Davi invited me to be Guest DT at Tuesday Throwdown and warned me I would have to work with digital images I couldn't turn her down!
    Beaded flower tutorial 1
    Recycling Craft
            Altered this cardboard box by lining it with pattern paper and layering with die cuts.I colored the cute Robyn Fetish image called "Lucy" with Staedtler watercolors [my first attempt at watercoloring with pencils!!] and added a diamond heart pendant in her hand [the diamond heart was salvaged from a broken earring!]
    Beaded flower tutorial 4
    Baby theme Box
            Inked and embossed the edges of the wild rose floral frame die cut with clear sparkle embossing powder to give a subtle sparkle.Added a tiny baby foot and a "baby" atop pink flowers on the corners of my box.My daughter wanted to know why I added a baby's foot on the flower..... I told her its a magical baby and was born from a flower !!
    Beaded flower tutorial 5
    Parchment Bow
           I made a bow from vellum using the lifestyle crafts Bow die and inked it pastel pink. If you love bows be sure to check out my  friend Sindhu's post on some super clever ways to make bows with dies.
    Beaded flower tutorial 6
    Beaded Flowers
    The pink daisy is a handmade foam flower [made by Daisy flower tutorial] you saw aplenty in the fairyland diorama too!
    The beaded flowers  you see in this altered box were super easy to make and so sharing this super simple tutorial to make a beaded flower spray
    Materials Required
    Beaded flower tutorial 13
    Beaded Flowers tutorial 
    • Beads - any shape or size you fancy
    • Wire - work with whatever gauge you are comfortable with!
    • Scissors or wire cutter- I used my favourite Tim Holtz scissors
    • Floral tape - in green ,brown or whatever color you fancy [ only recently I came to know that floral tape is available in pink color as well!!]
    Beaded flower tutorial 8
    Beaded Flowers tutorial 
    Depending on the size of your beads and the length of the flower branches you want cut a length of wire. I cut 3.5 inches wire to make each beaded flower branch. Its better to cut more wire than you need till you get the hang of it!! Thread 3 beads onto the center of the wire and bend the wire in a gentle U.
    Beaded flower tutorial 9
    Beaded Flowers tutorial 
    Hold the 3 beads in one hand and twist the wires to make a beaded flower branch! Super easy isn't it!!
    Beaded flower tutorial 
    Make more flower beaded flower branches and cut a length of floral tape as long as your beaded flower stem.
    Beaded flower tutorial 10
    Beaded Flowers tutorial 
            Twist one flower branch around another and once its fairly tightly twisted add another one.Dont worry about poking wire ends or bumpy bends..you are going to cover all that in floral tape!
    Beaded flower tutorial 11
    Beaded Flowers tutorial 
          Whoever invented floral tape is a genius!!I just love working with floral tape...it doesn't feel super sticky but sticks to itself so beautifully!...just wrap your floral tape around your beaded flower branches and keep pressing firmly while you roll it around your beaded flower stem.You don't even have to glue the loose ends! And your beaded flower spray is done.
    Beaded flower tutorial 7
    Beaded Flowers tutorial 
    This beaded flower tutorial  is a super easy version ! If you have a bit more time you can try the Beaded flower tutorial  or the Beaded tree tutorial .
    Beaded flower tutorial 3
    Beaded Flowers tutorial 
    I hope you enjoyed this crazily simple tutorial and do bear with me on my first attempt at watercoloring an image [I was super glad baby was a baldy and I didn't need to color hair ...not yet ready for hair days!! Ha Ha]

    Supplies:Dies : Spellbinders Majestic Labels 25, Wild rose studio floral frame, Marianne Anja leaves 3,Lifestyle crafts Bow,Couture creations Oval, Cheery Lynn  Sunflower die.Embellishments: Jesse James buttons , Baby bottle charm
    Linking to Crafting from the heart 34 sep 8 , Simon Says [stamp boldy]Addicted to Stamps 86 Sep 13 [pastel colors] ,Deep Ocean Challenge 85 Sep 7 [ something sweet],Fairytale Stampers 43 Sep 6,Robyn's fetish 227 Sep 6[ use a digi],Art by Miran 13, Sep 4 ,Artistic Inspirations 107 sep 7[memories],Crafty bloggers network Sep ,Delightful Challenges Sep 4 [Layer it],Scrappers Delight 30  sep 9 [ new beginnings],Stempelsonne 122 Sep 9 ,DL art sep linky ,My heart pieces Sep 20kk [ Digi stamp],Kraftzone Sep [ welcome Baby]

    Quilled Photoframe Teachers Day Gift

    $
    0
    0
    Quilled Photoframe  1
    Quilled Photoframe
            Dear friends Thank you so much for the encouraging comments on my first water-coloring attempt in the Baby theme box ! It has really helped to boost my morale !! Every year my daughter and I sit down to make something for her teachers for Teachers day which is celebrated on Sept 5 in India. Last year I was quite overwhelmed as I made more than 10 CD case notebooks and got thoroughly stressed! So this year for teachers day,undertook an easier craft- handmade photoframes !We recycled desktop calendars into easy DIY photoframes [see tutorials : Photoframe tutorial 1Photoframe tutorial 2Photoframe tutorial 3Easy Picture frame tutorial ].
    Quilled Photoframe  4
    Quilled flowers
              My little girl played an active role in making this particular one. The original base was a dull blue and none of our flowers and embellishments seemed to match it so I gave my ink pad to my kiddo and she randomly inked the blue corrugated paper frame base with purple!I had made these quilled flower buds some time back so just adding some pollens and stamped leaves helped us to quickly make our photoframe.
    Quilled Photoframe  5
    Quilled Photoframe
    For a dash of white to balance all the pink and purple added some lacey hearts with a few pearls to notch up the oomph factor!
    Quilled Photoframe  6
    Foam roses
    The pink roses are made from foam [ you all know how much I adore foam!!] and the leaves are cut from glittery card using the Cheery Lynn  flourish leaf die.The stem is a diamond chain salvaged from a dress[ you  have seen it in Sunflower layout and Fairyland diorama and will be seeing more if it till I strip the whole chain from my dress!! LOL ]
    Quilled Photoframe  3
    Quilled Photoframe
    The pink flower was made my layering several flower layers like in this easy paper flower tutorial 
    Quilled Photoframe  2
    Quilled Photoframe
               In this side view you can see the photoframe standing on its own. What I have seen is that though we crafters can admire and drool over cards like crazy, non-crafters seems to appreciate gifts with a bit of utility function like a photoframe, a post it note holder etc much more  than cards ! ......Please do share  your experience about this ? 

    Supplies- Dies : Heartfelt creations leaf, Marianne fence, Spellbinders lace hearts,Itsy Bitsy scallop daisy, Cheery Lynn  flourish leaf strip, Cheery Lynn butterfly,Sizzix flower layer 2.Stamps: Heartfelt creations leaf
    Linking to Scrappy land Ch 1 Sep 14, Cheery Lynn  [hearts a glow],Reves 2 scrap Sep[ color combo],Crafting by designs Sep,Moo Mania sep 9[ recycle - recycled a chain from a dress and a desktop calendar],Pennys Challenge 193 sep 9,Paper shelter 172 [ hearts/stars],Crafting from the heart 34 sep 8
    Viewing all 609 articles
    Browse latest View live